
Dev & Scripting » Coding Challenges » Breaking Google Minesweeper by Revealing the Mines
I don’t like the Minesweeper game, I always make stupid mistakes.
It would be much easier if the mines were shown.
I’m using the Brave browser.
Table of contents
Steps to Reproduce
Retrieving the Grid
So first, search for “google minesweeper” on the Google search engine. The integrated Minesweeper must appear on your search results. Open it.
Now, open your browser console (shortcut: F12).
Go to the “Sources” tab and select the javascript file that is located inside fbx/www.google.com/xjs/_js/k=[…]/ck/[…] in the left file tree:
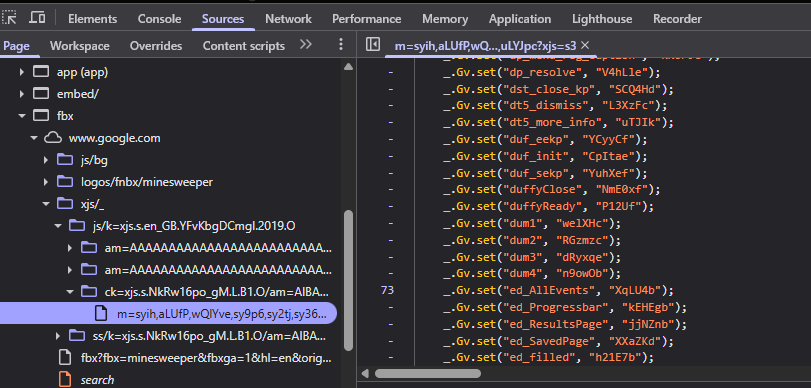
Important to remember: the Google code constantly changes. Filenames and property names will be different from what you’ll see on my screenshots. It’s normal.
Once you’re in the same file (that will probably have a different name), hit Ctrl + F and search for “//www.google.com/logos/fnbx/minesweeper/win_screen.png”:
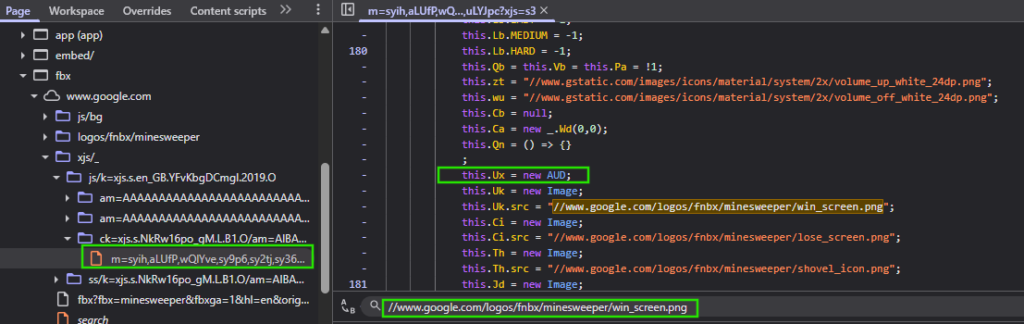
What we’re looking for is a line that is before this result. For me, it’s called this.Ux = new AUD;
For you, it will have a different name but a similar structure, and must be in the same position in relation to the win_screen.png that we searched.
Ok so now, remember the name that comes after “this.”. For me, I’ll remember that it’s “Ux”.
Next step: click on the left of this line, inside the margin. A blue symbol must appear:
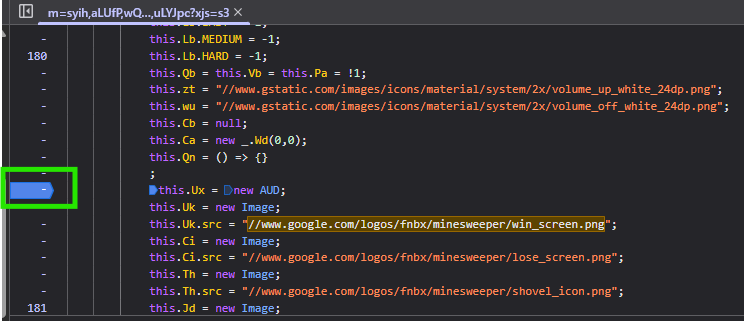
This is a breakpoint. It means that the browser will stop the execution of the code at this line.
Your next task is to reload the page, then reopen the minesweeper, and you should see something like that:
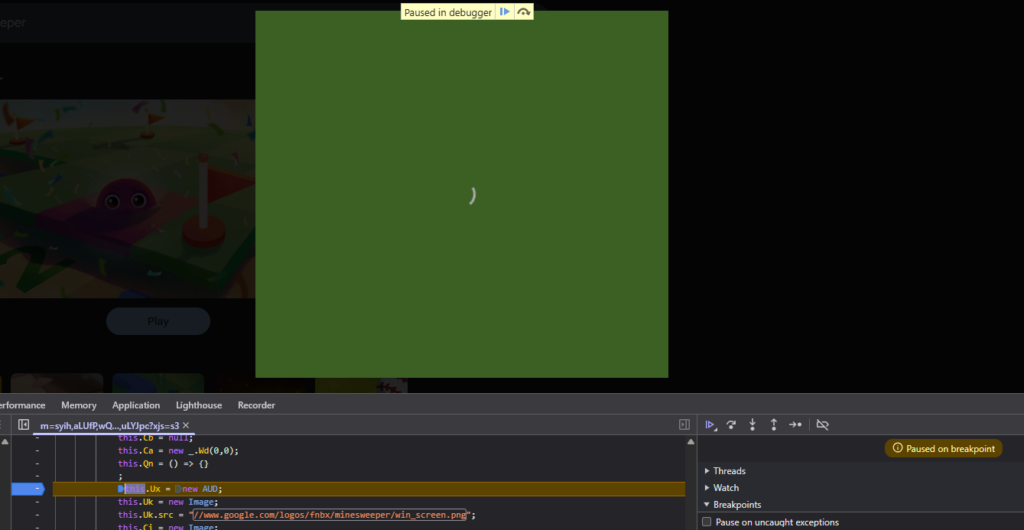
If the game is paused and keeps loading, great, it worked.
Now we’ll switch tab and go to the Console tab.
In the console, write the following code: window.gamebroken = this
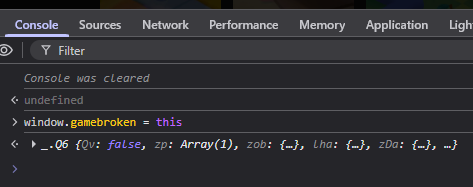
You should have a similar result.
Now go back to the Sources tab, remove the breakpoint by clicking on the blue icon and click on “resume script execution” icon in the top right:

The game is now loaded as usual.
Start the game by clicking on a random square so that the mines locations are generated.
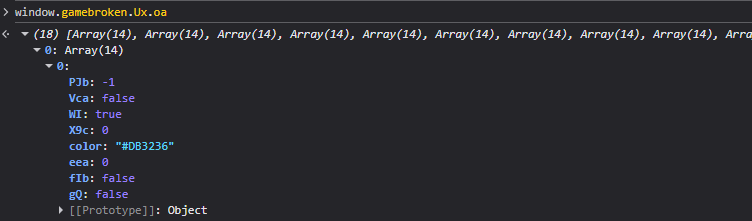
Ok so back to the Console. Remember your property name? For me it was Ux. So I’m going to type window.gamebroken.Ux.oa, but replace “Ux” by your property name.

As you can see, this is an array made of 18 rows that contain 14 cells. This is exactly the dimensions of the mineswepeer grid in the Medium difficulty mode.
Now we still have one step left: get the property name that is either true or false (false if there is no mine, true if there is a mine). To do so, you must click on the arrows at the left of the results and develop the output until you see a list of properties.
The property we’re looking for is either the penultimate or the last one (at least in my tests!). In my case, it’s called gQ and it’s set to false for the first cell:
Now we have everything to reveal the content inside each grid cell of the minesweeper.
In the console, write the following code:
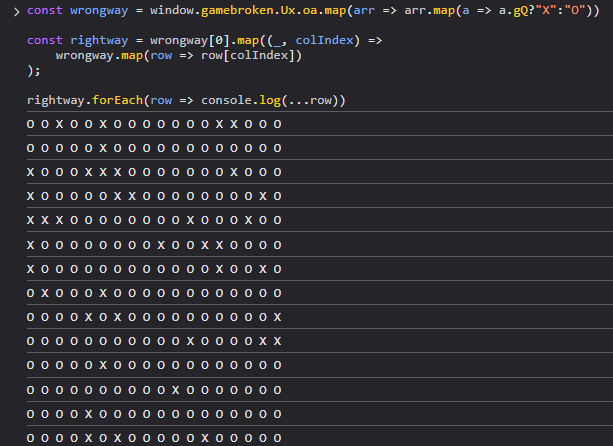
const wrongway = window.gamebroken.Ux.oa.map(arr => arr.map(a => a.gQ?"X":"O"))

const rightway = wrongway[0].map((_, colIndex) =>
    wrongway.map(row => row[colIndex])
);

rightway.forEach(row => console.log(...row))
You must replace the “Ux” with your property as well as the “a.gQ” by “a.YOURPROPERTYNAME”.
If it’s alright, you should see a grid like this:
However, if you have this:
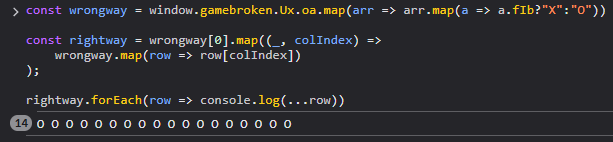
You chose the wrong cell property (in my case, I wrote a.fIb instead of a.gQ).
But if everything was alright, then now you have the grid, where “X” represents a mine and “O” a safe cell.
Displaying the Mines
We have the mines in the console, but it could be even better if they were displayed on the grid!
Copy paste the following code in your console, by replacing Ux and gQ by your values:
const mines = window.gamebroken.Ux.oa.map(r=>r.map(a=>a.gQ?"X":"O"));
const grid = mines[0].map((_,i)=>mines.map(r=>r[i]));

const canvas = document.querySelector("canvas");
const canvasWidth = parseFloat(getComputedStyle(canvas).width);
const canvasHeight = parseFloat(getComputedStyle(canvas).height);
const overlay = document.createElement("canvas");

overlay.width = canvasWidth;
overlay.height = canvasHeight;
overlay.style.position = "absolute";
overlay.style.left = canvas.offsetLeft + "px";
overlay.style.top = canvas.offsetTop + "px";
overlay.style.pointerEvents = "none";
overlay.style.zIndex = 9999;
canvas.parentElement.appendChild(overlay);

const octx = overlay.getContext("2d");

const rows = grid.length;        // 14
const cols = grid[0].length;     // 18
const cellWidth = canvasWidth / cols;
const cellHeight = canvasHeight / rows;

grid.forEach((row, y) => {
  row.forEach((cell, x) => {
    if (cell === "X") {
      octx.fillStyle = "rgba(0,0,0,0.8)";
      octx.fillRect(x * cellWidth, y * cellHeight, cellWidth, cellHeight);
    }
  });
});
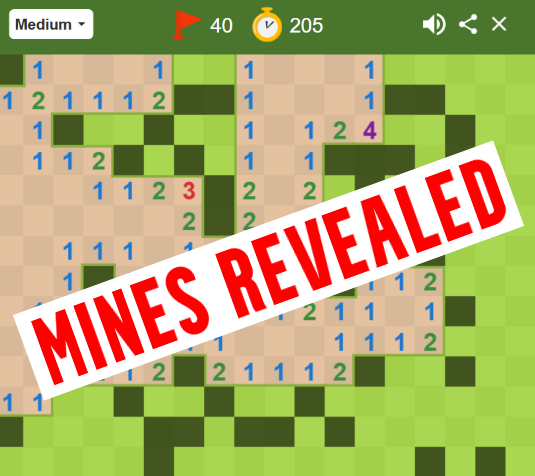
If successful, you should see this:
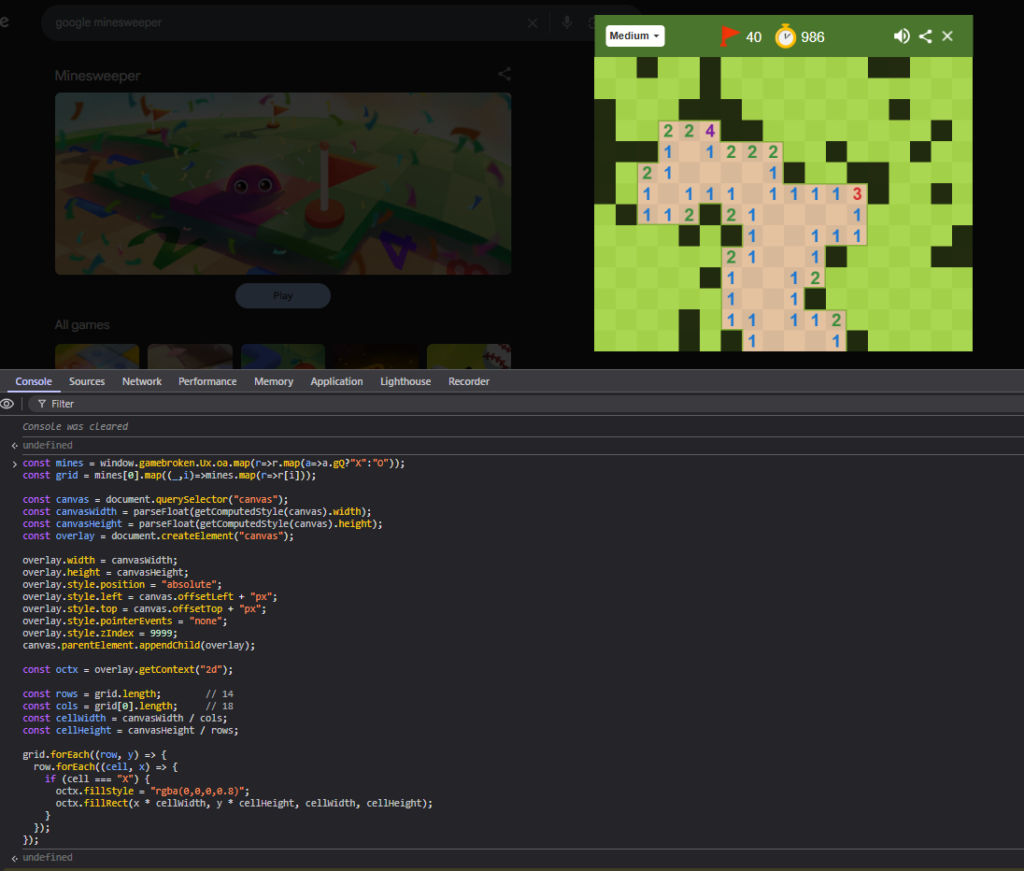
Yeah, much easier now.
How I Found it
It’s not that much of an accomplishment, all the code is visible in the browser.
My first action was to see what events were created on the HTML canvas of the game.
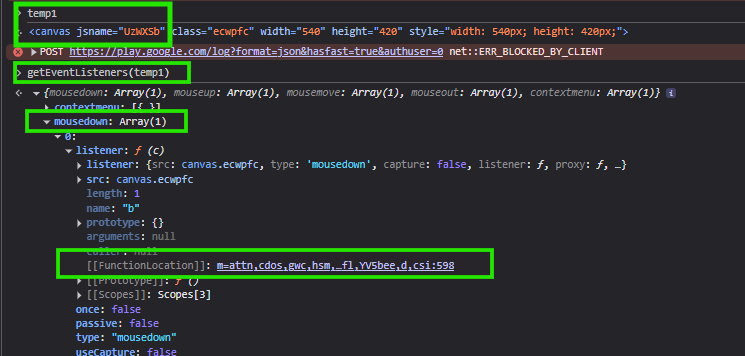
I selected the canvas and right clicked the HTML tag to store it as a global variable inside the console:

Using getEventListeners(), we find the location of the function that handles the mousedown event:
I ended up close to the actual js file that we were talking about:
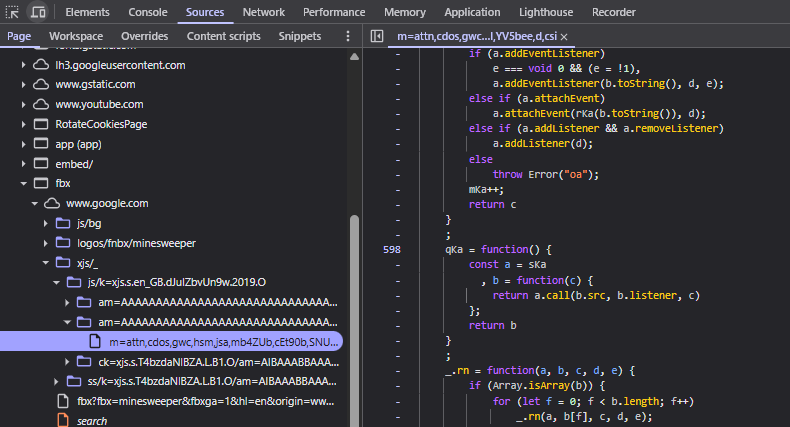
I started searching for keywords like “flag”, “mine” etc. that are all elements of the game. I quickly found a very interesting switch statement in one of the js files:
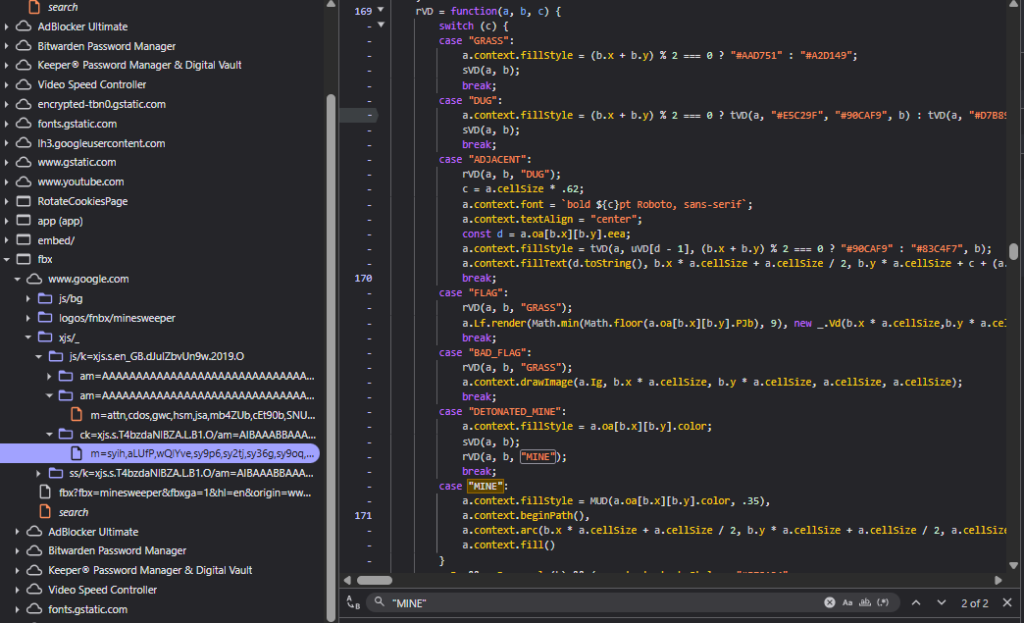
It looks like the code that is called after each user click, that determines what to do whether the user clicked on a mine, set a flag, etc. Surely there is a variable somewhere around there that holds the location of mines.
The minesweeper canvas must be stored somewhere in a variable.
If we count the number of cells on the Medium game, it’s 18 by 14. So we’re likely searching for an array of 18 * 14.
I knew this variable would probably be a property of an object, not just a global variable.
SO I just started putting breakpoints every where, and going through each object properties that I could see through the debugger.
Quickly I found what I was looking for, by putting a breakpoint in the “DETONATED_MINE” switch case, clicking on a mine, and looking at a property called “oa”:
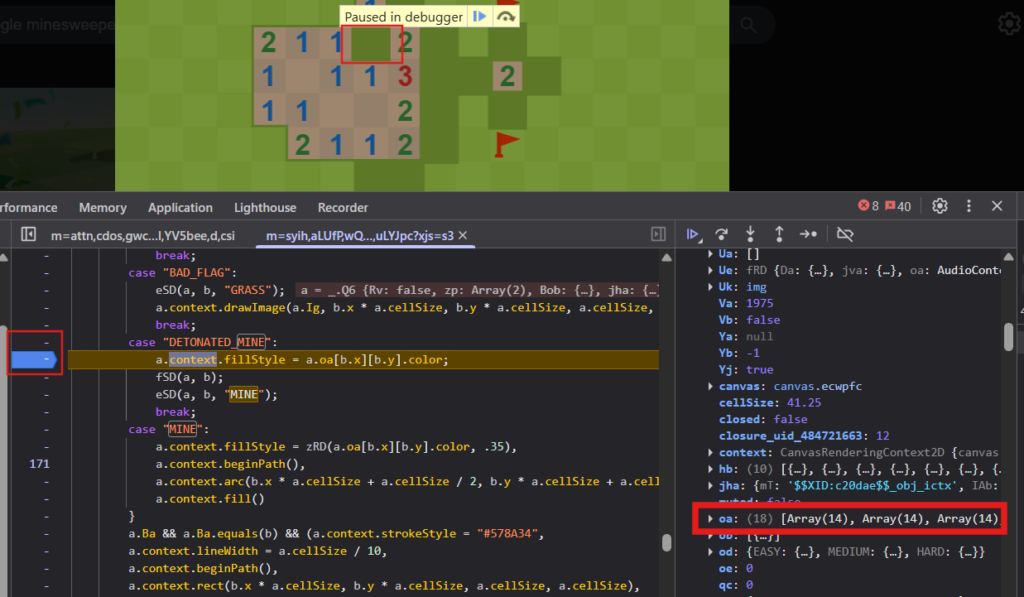
Ok, this property holds the grid layout. However, it’s not over.
I can’t just go in the console and access this property blindly, it’s part of an object.
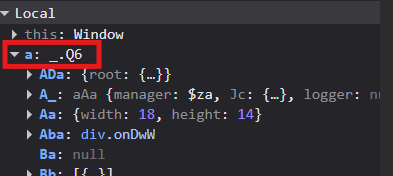
This “oa” was the property of an object called “a”, that is an instance of the “_.Q6” class:
Therefore I searched for _.Q6 inside the code, and put a breakpoint in its constructor() method:
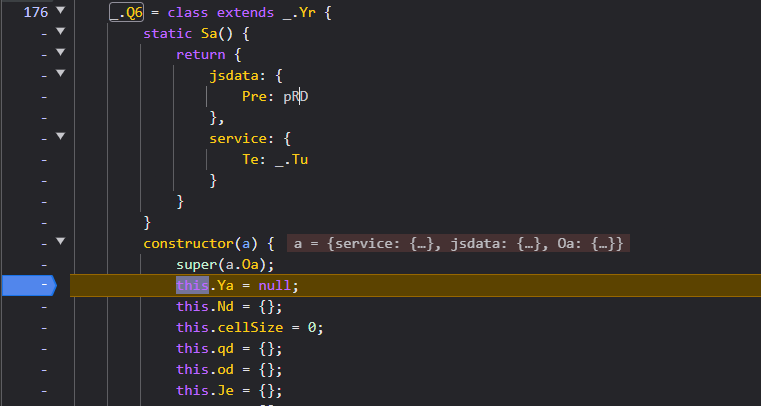
That way, every new instance of that class would trigger the breakpoint and I will be able to turn this instance into a global variable.
Because the problem is the following: I have the solution, I found the array that holds the grid layout, but the object is not accessible in the console. So I must store it when it’s initialised and then it’ll be OK.
So I went to the console and typed window.__Q6 = this to capture the value of ‘this‘ (at the time of the breakpoint) into a global variable window.__Q6 so I’m able to access its value even after ‘this‘ becomes something else.

And the updated grid array is in its properties:
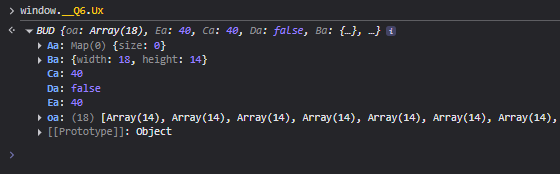
It’s still a bit weird to me why some Google code is perfectly human readable (like the switch statement) while other parts of the code are obfuscated and minified.
Then, to reveal the mines on top of the original canvas, I created another canvas that sits above the game. It copies the game’s dimensions and fills the cells holding the mines with a black square. It also must be transparent to the pointer events so our clicks still end up on the original canvas below it.
I had to create another canvas because modifying the original canvas did not work, Google code updated the grid everytime it was modified and the black squares were removed.
Disclaimer
This content is shared for educational and experimental purposes only.
The techniques discussed apply to public, client-side browser games with no real-world impact.
This blog does not encourage cheating, abuse, or violation of terms of service.
Any use of this information is done at your own responsibility.