

Fundamentals » Linux Commands » curl Quick Tutorial – Everything You Need to Know
This post covers every useful option of curl, a command line tool used to make HTTP requests.
Table of Contents
curl – Introduction
curl is a command-line tool for transferring data with URLs. It supports HTTP, HTTPS, FTP, and more, but in this post we’ll focus on HTTP(S).
Basic syntax:
curl [OPTIONS] <URL>
Example:
curl pentestguides.com
We are going to see a dozen use cases to understand better what we can do with curl.
Basic GET Request
The most common use case of curl: making a simple HTTP GET request to a web app.
curl pentestguides.com
Silent mode (no progress bar and stats) with the -s option:
curl -s https://pentestguides.com
We can save the output to a file using the -o option:
curl -o index.html https://pentestguides.com
By default, curl does not follow redirections (HTTP status codes starting with 3). We can change this behavior with the -L option (L like the Location header that defines the URL of the redirection):
curl -L https://example.com
Note: we can chain options:
curl -L -o index.html https://example.com
curl -Lo index.html https://example.com
HTTP Methods
By default, curl will use the GET method. But the -X option allows us to change the method used:
curl -X GET https://pentestguides.com
curl -X DELETE https://examplesite.com/api/users/34
curl -X POST https://foo.com
Note that a POST request must include the POST data, defined with the -d option.
The -X option is optional for GET requests (because it’s GET by default) as well as POST requests (because the -d option implies that the method used is POST).
curl supports all the standard HTTP methods, and we can also specify anything, like:
curl -X BANANA https://pentestguides.com
Note that the -I option (capital i) can be used to make a HEAD request (only retrieve the HTTP response headers):
curl -I pentestguides.com
Sending GET and POST Data
GET Data
Sending GET data is done through the parameters inside the URL:
curl "https://pentestguides.com/?s=nmap&foo=bar"
However, if the URL gets very long, the -d option can be used, just like with POST data, but we also need to specify the --get parameter otherwise curl will think we are making a POST request:
curl --get -d "s=nmap" -d "foo=bar" https://pentestguides.com/
curl --get -d "s=nmap&foo=bar" https://pentestguides.com/
POST – Form data
To send basic form data through a POST request, we can simply use the -d option and the -X POST option:
curl -X POST https://examplewebsite.com/login -d "username=admin&password=secret"
To be even more explicit, we can define the HTTP Conten-Type header with the -H option:
curl -X POST https://examplewebsite.com/login -d "username=admin&password=secret" -H "Content-Type: application/x-www-form-urlencoded"
POST – JSON data
To send JSON data, we must specify the JSON value with a correct JSON syntax inside the -d option as well as the correct HTTP Header for JSON data:
curl -X POST https://examplewebsite.com/ \
  -H "Content-Type: application/json" \
  -d '{"name":"foo","id":10}'
Note: the “\” characters mean “the command continues on the next line”, useful to split the commands on multiple lines.
Sending Files
Wen can send files with curl, just like we would do by selecting a file on a classic website form.
Classic Form File Upload
The -F option allows us to define the data, just like with the -d option:
curl https://api.example.com/upload \
  -F "fileToUpload=@/home/john/Downloads/report.pdf" \
  -F "foo=bar"
As you can see, the absolute file path is provided, and a @ character appears before it. This is used to tell curl to retrieve the content of the file and set it as the content of the fileToUpload parameter. Then, we can define other parameters that are not files but also part of the form submission.
To be even more explicit, we can define the relevant HTTP header:
curl https://api.example.com/upload \
  -H "Content-Type: multipart/form-data" \
  -F "fileToUpload=@/home/john/Downloads/report.pdf" \
  -F "foo=bar"
Send Raw File as Request Body
We can also use curl to send raw file as request body, especially useful with a PUT request:
curl -X PUT https://examplewebsite.com/upload/ \
  --data-binary @data.csv
The --data-binary replaces the previous -F option.
HTTP Authentication and Tokens
curl handles the HTTP Basic Authentication with the -u option:
curl -u username:password https://examle.com/protected
Username and passwords are separated with “:”.
Note that this shows the password in the commands history. We can specify only the username, and then curl will prompt the password:
curl -u username https://examle.com/protected
For a Bearer authentication, we can simply use a custom HTTP Header with the -H option:
curl -H "Authorization: Bearer <TOKEN>" https://site.com
Custom HTTP Headers
As we saw previously, we can define custom HTTP Headers with the -H option.
This is useful when we want to define a certain Content-Type, or define custom application-specific HTTP Headers. Example:
curl -H "X-API-TOKEN: foo" https://site.com/api/v1/users/list
Cookies
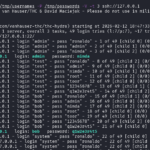
curl allows us to save the cookies we receive from the server with the -c option, followed by the file where we want to save the cookies:
curl -c cookies.txt https://pentestguides.com
Example:

Using “> /dev/null” hides the output of curl (it is sent to /dev/null)
We can also send cookies with the -b option. It can either be the cookies file or a cookie expression like a form data:
curl -b "session_id=foo&token=bar" https://site.com/profile
curl -b cookies.txt https://site.com/profile
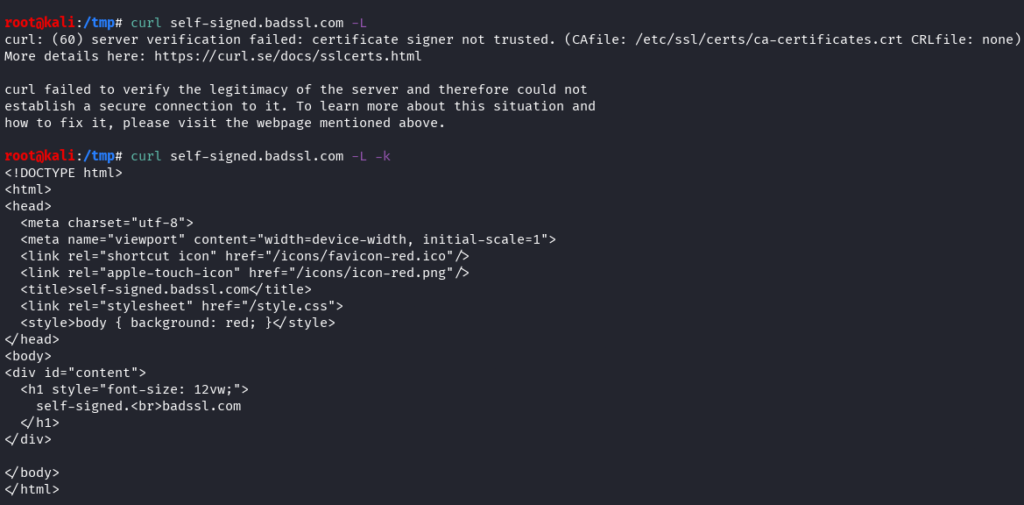
HTTPS / TLS Options
We can use the -k option to ignore the TLS certificate errors:
curl -k site.com
Example:
We can also specify the certificate using the --cert option:
curl --cert client.pem https://site.com
Other options
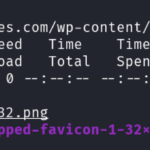
Downloading files
We can download a file (store the content in a correct format) with the -O option:
curl -O https://site.com/file.pdf
Example (downloading the favicon of pentestguides):

Note that the local file has the same name as the remote file.
Show Response Headers
The -i option can be used to show the HTTP response headers as well as the body:
curl -i https://pentestguides.com/
Timeout and Retry
We can set the timeout with the --max-time option. Setting it to 10 for instance means that curl will abort the request after 10 seconds of timeout:
curl --max-time 10 https://site.com
We can also set a number of retries when a request fails with the --retry option (request fail = either timeout or HTTP 5xx code):
curl --retry 5 https://site.com
curl Options Summary
Here is a quick summary of curl options:
| Option | Meaning |
|---|---|
| -X | HTTP Method |
| -d | send form data |
| -F | multipart form (send files) |
| -H | custom HTTP header |
| -u | basic HTTP auth |
| -o | save the response to file |
| -O | download a remote file |
| -L | follows redirects |
| -I | only shows the response headers |
| -i | include headers in the response |
| -v | verbose mode |
| -k | ignore SSL errors |
--retry | max number of retry per request |
Common Pre-made curl Examples
curl -c cookies.txt -X POST https://example.com/login \
  -d "username=admin&password=nimda" -sL

curl -b cookies.txt -sL https://example.com/profile
Call JSON API with Token:
curl -X POST -s https://api.example.com/basket \
  -H "X-API-TOKEN: $TOKEN" \
  -H "Content-Type: application/json" \
  -d '{"user_id":149820, "item_id": 389, "amount": 2}'
Test a REST API locally (preprod):
curl -X PUT -sk localhost:8000/users/1 \
  -H "Content-Type: application/json"
  -d '{"name": "new name"}'
Final Thoughts on curl
curl is a very useful tool to interact with web apps. We can easily send and customize HTTP requests from our terminal.
This is great for a quick overview of a website, to test APIs or during CTF / penetration testings.
Enjoyed this post? Read more from PentestGuides:
- ftp Complete Tutorial in 10 Examples – Must-know Command for CTF
- scp Quick Tutorial – Transfer Files Securely Over SSH

- curl Quick Tutorial – Everything You Need to Know
- Netcat (nc) Full Tutorial – Easy TCP/UDP Guide
- nmap Tutorial – the Ultimate Network Scanner

- Hydra Tutorial – How to Effortlessly Brute-force Network Services
- Solving Lookup – TryHackMe Challenge Writeup

- Solving Basic Pentesting – TryHackMe Challenge Writeup

- RootMe Writeup – Full TryHackMe CTF Solution

- Corridor Writeup – TryHackMe IDOR Challenge

.
Disclaimer
All content published on this website is for educational purposes only.
The techniques, tools, and methodologies described here are intended to be used only on systems you own or have explicit permission to test.
I do not encourage or take responsibility for any illegal use of the information provided.