
Pentest Methodology » Pentest Tools » Web » nmap Tutorial – the Ultimate Network Scanner
In this post, we are going to see all the use cases of nmap, probably the most useful pentesting tool.
⚠️ DISCLAIMER: this tutorial is intended strictly for educational purposes and authorized security testing in controlled environments. Only test systems you own or have explicit permission to assess. Unauthorized use of password cracking tools is illegal and unethical.
Table of contents
Introduction – What is nmap?
Nmap (Network Mapper) is an open-source network scanning tool used for host discovery and service enumeration.
Nmap allows us to:
- Discover active hosts on a network
- Identify open ports
- Detect running services and their versions
- Attempt operating system fingerprinting
- Run enumeration or vulnerability scripts via the Nmap Scripting Engine (NSE)
In a penetration test or CTF, nmap is one of the very first tools used. Because before exploiting anything, we need visibility. nmap helps us answer the 2 fundamental questions:
- What machines are alive?
- What services are exposed?
Understanding Ports and Services
Before going further:
While an IP address identifies a machine, a port identifies a specific service running on that machine.
Examples:
- Port 22 = default SSH port
- Port 80 = default HTTP port
- Port 443 = default HTTPS port
- Port 53 = default DNS port
I wrote default because I can decide that my HTTP service runs on port 53, nothing prevents me from doing that. It’s just a standard that HTTP runs on port 80.
There are 65,535 TCP ports and 65,535 UDP ports per host.
I can’t make my HTTP service listen on port 65,536. I’m limited by the 2^16 ports.
When a port is:
- Open: a service is listening and responding
- Closed: reachable, but no service is listening
- Filtered: a firewall or any filtering device is blocking access to the port
Scanning ports is essentially mapping the exposed attack surface. It’s almost always the first thing we need to do during CTF.
Basic nmap Usage
First, we are going to see:
- What nmap does by default when it’s launched without any options
- How to define our targets
- How to manage the DNS actions performed by nmap
- How to manage host discovery
- What port scanning techniques can be used
- How to detect OS and service versions
- Some verbosity and diagnostics options
- And of course, examples of ready-to-use nmap commands, useful for CTF
Then we’ll see more advanced options.
What Nmap Does by Default
When we run nmap with only the target:
nmap 192.168.1.1
By default, nmap:
- Performs host discovery (ICMP echo, TCP ping and ARP ping if the target is on our local network)
- Scans the 1,000 most common TCP ports in a random order
- Uses a SYN scan (-sS) if run with root privileges
- Performs reverse DNS resolution
- Displays port states (open, closed, filtered)
With all the options supported by nmap, we can tell nmap to perform more operations or change this default behavior.
One of the first things we need to know is how to provide our targets to nmap.
Defining Targets
Targets can be: a single IP address, a CIDR range of IP addresses, an IP range or a domain name.
They can be provided in the command line or they can be stored into a file (using the -iL option):
# Single IP:
nmap 10.10.10.1

# CIDR range:
nmap 10.10.10.0/24

# IP range:
nmap 10.10.10.1-200

# Domain name:
nmap pentestguides.com

# Retrieve targets from a file:
nmap -iL targets.txt
We can decide to exclude some of the targets using the –exclude option. For instance, if we specify a range of IP addresses (a CIDR or a range like 10-100) or targets from a file, we can exclude specific IP addresses among those targets that we decide not to scan.
Also, the –excludefile option allows us to specify a file that contains all the targets we want to exclude.
Finally, we can tell nmap which network interface card to use when reaching the targets with the -e option:
# Exclude 10.10.1.100 from the CIDR range:
nmap 10.10.1.0/24 --exclude 10.10.1.100

# Exclude all the targets defined inside exclude.txt!
nmap -iL targets.txt --excludefile exclude.txt

# Tell nmap to use the outgoing NIC eth0 in order to reach the target:
nmap -e eth0 10.10.10.1
That’s all for the target part.
DNS Control
As said earlier, nmap will perform a reverse DNS lookup by default on the provided IP address. Most of the time we won’t need this feature, so we can disable it to make the scan faster.
Here are the 2 main DNS options:
- -n: disable reverse DNS on the targets
- –dns-servers 8.8.8.8: specify the DNS server to use (by default, nmap will use the DNS configured on the system)
# Disable reverse DNS
nmap -n 10.10.10.1

# Specify the DNS server to use
nmap --dns-servers 8.8.8.8 mytarget.com
Host Discovery
As we saw earlier, nmap will scan the 1,000 most common TCP ports by default on the provided target.
However, we can disable the port scan functionality if we only want to use nmap to discover active hosts, with the -sn option.
We can also disable the default ping initiated by nmap with -Pn and –disable-arp-ping options:
# Only discover live hosts (no port scan):
nmap -sn 10.10.1.0/24

# Avoids the initial ping (treat host as alive):
nmap -Pn --disable-arp-ping 10.10.1.100
If we choose to disable port scan and only discover live hosts, by default nmap will use common ping techniques such as ICMP Echo requests. It’s good to know that many other options are available for host discovery:
-PS TCP SYN ping
-PA TCP ACK ping
-PU UDP ping
-PY SCTP ping
-PE ICMP echo
-PP ICMP timestamp
-PM ICMP netmask
-PO IP protocol ping
We are not going to describe each of those methods, it’s not the point of this tutorial.
nmap Port Scanning Options
This section includes 3 different sections:
- Selecting the ports we want to scan
- How to scan TCP ports
- How to scan UDP ports
Selecting Ports
The -p option allows us to select ports. It’s pretty easy to understand:
# Scan all ports
nmap -p- target
nmap "*" target

# Scan specific ports
-p 80
-p 22,80,3306

# Scan port ranges
-p 22-80

# Mix
-p 22,25-80,1000

# Scan ports associated to protocols/services
-p http,ssh
Other options are also available to define the ports we want to scan: -F scans the top 100 most common ports, and –top-ports X let us choose the X most common ports:
# Fast scan (100 ports):
nmap -F target

# Top 500 ports
nmap --top-ports 500 target
nmap TCP Scan Types
Many TCP Scan methods are supported by nmap. This defines how the TCP connections will be made and with which flags.
If you are a bit lost, I advise you to learn how TCP works, what are the main flags and the workflow of a TCP connection.
Mainly, we have TCP SYN Scan and TCP Connect Scan.
- TCP SYN Scan (-sS) is the “stealth scan”. It sends a SYN packet and doesn’t complete a full TCP handhaske. It’s the most commonly used scan type, the one we use the most during CTF and real life pentesting.
- TCP Connect Scan (-sC) is the more detectable scan, as it attempts to complete a full TCP handshake with each port.
How to use them:
nmap -sS target
nmap -sC target
Other TCP scan types are available, but they are rarely used and only in specific contexts, like detecting firewall rules:
-sN: NULL Scan, sends packets with no TCP flags set
-sF: FIN Scan, sends only the FIN flag
-sX: "XMAS" Scan, sends packets with the FIN, PSH and URG flags
-sA: ACK Scan
--scanflags gives us the full control over the TCP flags that need to be set
UDP Scan
The only option available for UDP scanning is -sU.
UDP scanning is slower and less reliable than TCP scanning. Less services run on TCP.
Nonetheless, during a real penetration testing, it’s a terrible mistake to skip UDP services, because many protocols run over UDP:
- DNS (port 53)
- SNMP (port 161)
- DHCP (port 67)
- etc.
Skipping UDP = potentially miss the UDP services.
How to use the -sU flag:
nmap -sU target
Mixing UDP and TCP
It’s possible to scan UDP and TCP ports in a single nmap command, using U and T to define UDP and TCP ports as well as the -sU and a TCP scan option like -sS:
nmap -sS -sU -p U:53,T:80:8000 target
OS and Services Detection
nmap can attempt to guess what Operating System the targets are using (e.g. what Linux version?), as well as the versions of the detected services (for instance, what Apache version is running on the HTTP service, or what OpenSSH version is running on the SSH service).
The options are the following:
- -sV to detect service versions
- -O to detect the OS
How to use them:
nmap -sV -p 22,80 target
nmap -O target
Verbosity and Diagnostics
If we want nmap to be more verbose and look under the hood, we can use multiple additional options:
- -v, -vv and -vvv: verbose, very verbose and very very verbose
- –reason: nmap “explains” why a port is in a given state
- –packet-trace: packet-level information for debugging purpose
- –traceroute: performs a traceroute on the target(s)
- –version-trace: shows detailed version scan activity (must be used with -sV)
How to use those options:
nmap -v [other options] target
nmap -vv [other options] target
nmap -vvv [other options] target
nmap --packet-trace [other options] target
nmap --traceroute [other options] target
nmap -sV --version-trace [other options] target
Ready-to-use nmap Commands
Let’s see some common nmap commands:
Typical CTF scan: TCP SYN, all ports, no ping, OS and services detection, fastest scan (-T5 option is explained in the Advanced Section):
nmap -sS -sV -O -p- -T5 -Pn --disable-arp-ping TARGET
Typical UDP scan: we only scan the top 500 because it’s very slow:
nmap -sU --top-ports 500 -Pn --disable-arp-ping -sV -O TARGET
Host discovery on a local network:
nmap -sn -PE xxx.xxx.xxx.0/23
Click here to see posts containing nmap scans
Advanced nmap Usage
In this second section we are going to see:
- Timing control options
- Firewall evasion techniques
- NSE (Nmap Scripting Engine)
- Output options
Those advanced options are not frequently necessary, especially during CTF, however it’s very useful to know them during specific occasions or harder CTF or hardened real-life environments.
Timing Control
nmap offers options to cap the delay at each port probe, from -T0 (extremely slow) to -T5 (very aggressive).
For example, using -T5 will cap the timeout delay at 5ms for each port. We can also specify -T5s to cap this delay at 5s instead of ms.
Other options are available to control the timing of nmap:
- –scan-delay 10s = wait 10 seconds between each port probe
- –min-rate 30 = sends at least 30 packets per second
- –max-rate 100 = sends at most 100 packets per second
- –host-timeout 1m = gives up on the target after 1 minute of timeout
- –min-parallelism 10 = at least 10 jobs scanning the target(s) at the same time
- –max-parallelism 50 = at most 50 jobs scanning the target(s) at the same time
- –max-retries 2 = try twice for each port before giving up on the port
Adjusting the timing might be crucial in a real environment. In CTF, it’s most likely not needed.
nmap Firewall Evasion Techniques
Many options are available:
# Source port manipulation: packets will be sent from port 53
# e.g. useful when some misconfigurations allow incoming packets from port 53 (DNS port)
nmap -g 53 TARGET
nmap --source-port 53 TARGET

# Decoys: adds 2 fake source IP addresses to "hide" our real scanner
nmap -D RND:2 TARGET

# Randomize hosts order, must be used when scanning multiple hosts
nmap --randomize-hosts -iL targets.txt

# MAC Address Spoofing when scanning local targets.
# 0 = random, we can also specify a MAC address or a vendor
nmap --spoof-mac 0 TARGET
nmap --spoof-mac apple TARGET

# Data padding: adds 25 random bytes to the packets
nmap --data-length 25 TARGET

# Idle Scan (zombie scan)
# Uses a third-party “zombie” host to perform a blind scan. Stealthy but requires specific conditions.
nmap -sI zombie_address TARGET

# Transport Layer scan
# Identifies supported IP protocols by the target: TCP, UDP, ICMP, etc.
nmap -sO TARGET

# Send raw Ethernet frames instead of IP-level packets
nmap --send-eth TARGET
NSE – Nmap Scripting Engine
The list of available nmap scripts is available here.
We can use those scripts using the –script option.
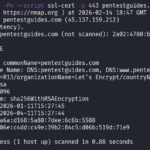
Example running the ssl-cert script on pentestguides.com to retrieve the TLS certificate information:
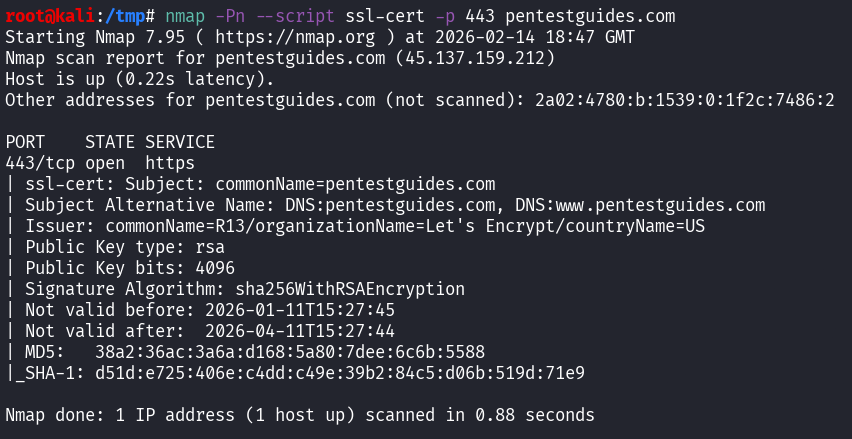
Command used:
nmap -Pn --script ssl-cert -p 443 pentestguides.com
Nmap scripts are written in Lua. They can help us to:
- Enumerate services and retrieve more information
- Detect known vulnerabilities
- Brute-force services
We can write our own custom Lua scripts to be used by nmap, but it’s not within the scope of this tutorial.
Output Options
Just a quick note on output. Since the beginning, nmap outputs everything in the standard output, but it can output results inside a file with multiple formats:
-oN results.nmap = stores the normal output inside results.nmap
-oX results.xml = stores the output as XML
-oG results.gnmap = stores the output as a grepable set of data for further use with tools
-oA results = creates the 3 previous files with the 3 different formats
Example:
root@kali:/tmp# nmap -Pn -p 443 -sV -oG pentestguides.gnmap pentestguides.com
Starting Nmap 7.95 ( https://nmap.org ) at 2026-02-14 18:54 GMT
Nmap scan report for pentestguides.com (45.137.159.212)
Host is up (0.22s latency).
Other addresses for pentestguides.com (not scanned): 2a02:4780:b:1539:0:1f2c:7486:2

PORT	STATE SERVICE  VERSION
443/tcp open  ssl/http LiteSpeed httpd

Service detection performed. Please report any incorrect results at https://nmap.org/submit/ .
Nmap done: 1 IP address (1 host up) scanned in 17.63 seconds

root@kali:/tmp# cat pentestguides.gnmap
# Nmap 7.95 scan initiated Sat Feb 14 18:54:35 2026 as: /usr/lib/nmap/nmap -Pn -p 443 -sV -oG pentestguides.gnmap pentestguides.com
Host: 45.137.159.212 () Status: Up
Host: 45.137.159.212 () Ports: 443/open/tcp//ssl|http//LiteSpeed httpd/
# Nmap done at Sat Feb 14 18:54:53 2026 -- 1 IP address (1 host up) scanned in 17.63 seconds
Final Thoughts on nmap
As we saw in this post, nmap is not just a port scanner. It’s a flexible network reconnaissance tool capable of:
- Host discovery
- TCP and UDP enumeration
- Service and OS fingerprinting
- Firewall evasion testing
- Executing scripts
- Precise timing and output control
It’s a tool that is absolutely mandatory in the toolbox of a pentester or CTF player.
If you liked this post, you will like those other posts from pentestguides:
- ftp Complete Tutorial in 10 Examples – Must-know Command for CTF
- scp Quick Tutorial – Transfer Files Securely Over SSH

- curl Quick Tutorial – Everything You Need to Know
- Netcat (nc) Full Tutorial – Easy TCP/UDP Guide
- nmap Tutorial – the Ultimate Network Scanner
- Hydra Tutorial – How to Effortlessly Brute-force Network Services
- Solving Lookup – TryHackMe Challenge Writeup

.
Disclaimer
All content published on this website is for educational purposes only.
The techniques, tools, and methodologies described here are intended to be used only on systems you own or have explicit permission to test.
I do not encourage or take responsibility for any illegal use of the information provided.